Data-logging is the act of saving recorded data so it can be viewed and analysed at a later time. GWv4 gives you control of two forms of data-logging: ECU internal logging - the data is recorded and stored in the ECU then can be downloaded by GWv4 or a data-analysis package and; PC Logging - data is logged by GWv4 and stored on the hard disk of the computer. Data-logging can record any channel which is available in the current ECU.
Note
ECU Internal Logging is only available where the feature is available on the ECU that is being used with GWv4.
PC Logging is data-logging that is done by the PC. Data is recorded by GWv4 and stored to the hard disk. The recorded data-log can then be either played back by GWv4 (see Log Playback) or can be loaded and analysed by GEMS data-analysis software. PC logging can log any of the channels in available in the current product.
To access PC Logging select Configure PC Logging.
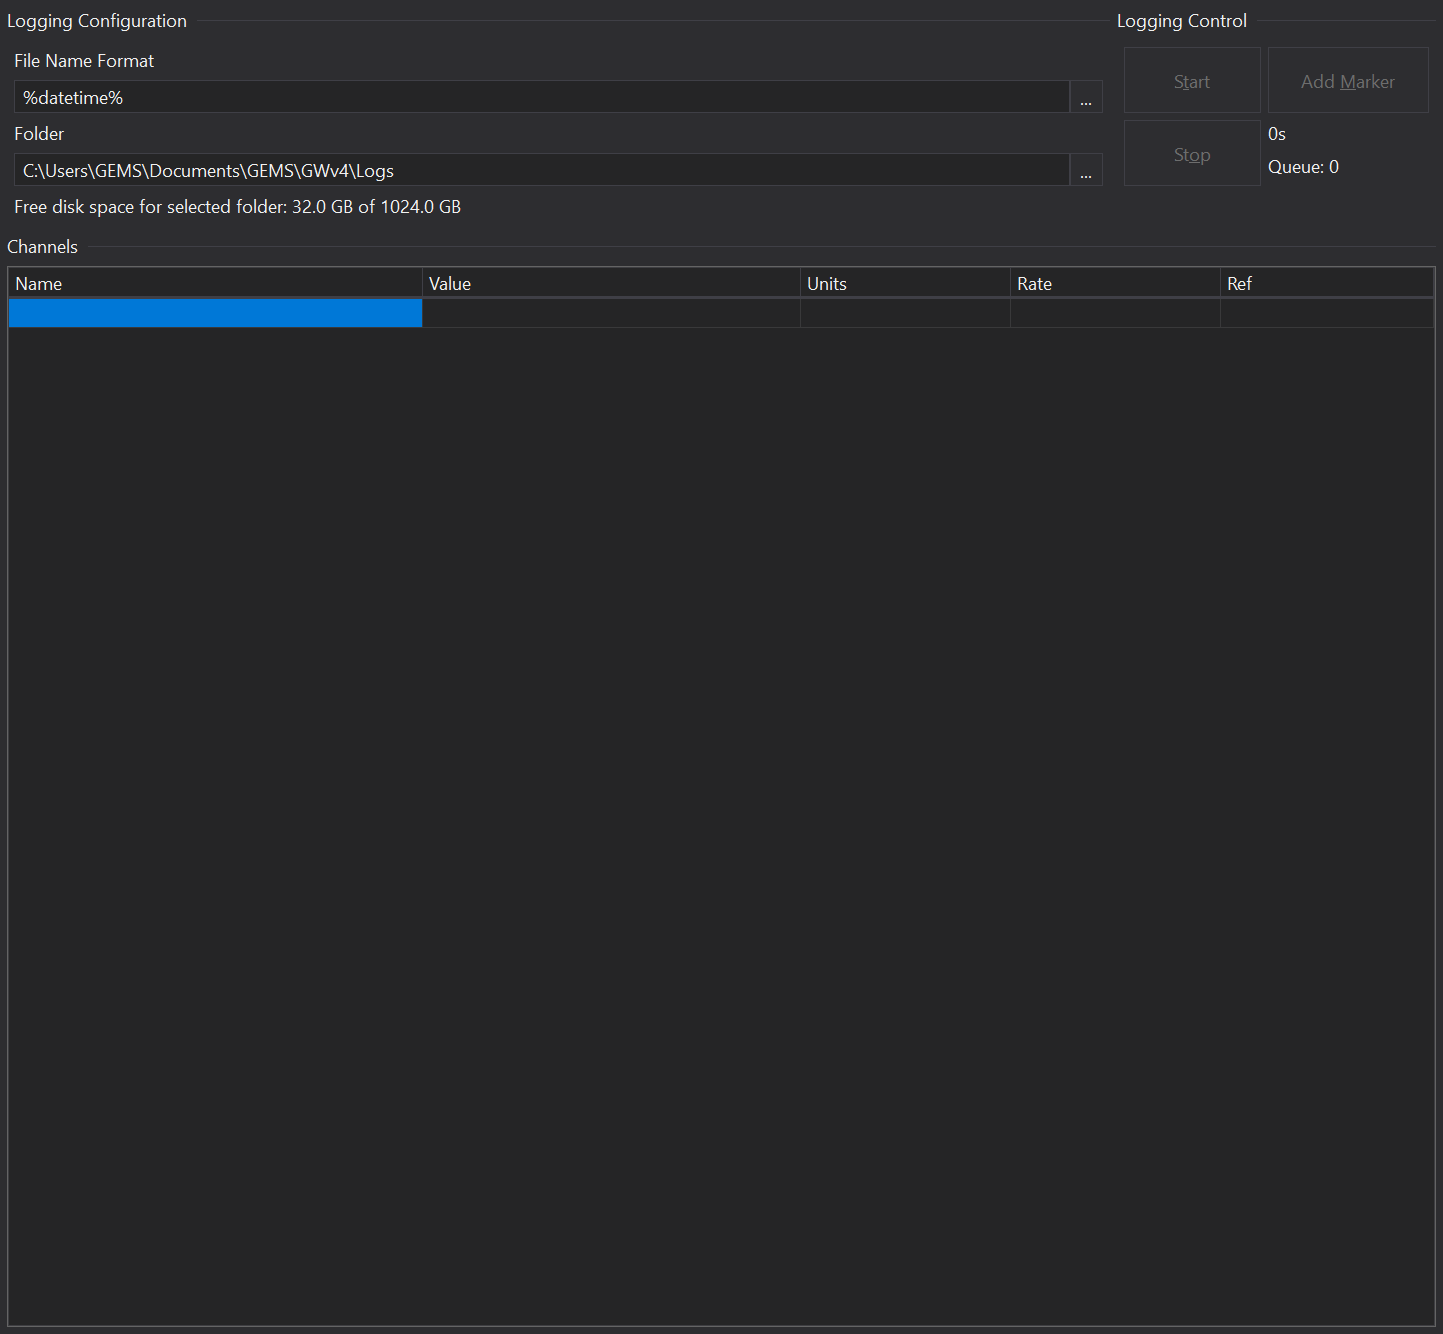
A new tab dedicated to PC logging will then be opened, as show in the following picture. Only one PC Logging tab can be opened at a time.
Log Folder
The log folder is where the data for the log will be recorded to while the logging is taking place. The actual viewable log file can be saved else where after the log is complete. Make sure there is plenty of free space available. How much space is left is displayed below the log folder. To change the path of the log folder click the ‘…’ button to the right of the log folder and select a folder. The folder can also be changed in the Preferences section in the menu Preferences...Alt-F7 and selecting the folders section.
File Name Format
This is the format of the name that will be given to the log file when logging has been completed.
Log Control
To start logging, click the ‘Start’ button, to stop, click the ‘Stop’ button. At any point whilst logging you can add a manual marker in the log by clicking the ‘Add Marker’ button. In the log this will appear as a manual/hand marker.
Channels to be logged
This section contains the channels that are to be logged by the PC Logging. To add a channel click in an empty cell, then either start typing and a list will appear of close matches to what has been type, or click the ‘…’ button to the right of the cell and a box will appear with all available channels. To add another channel repeat the process until you have everything showing that you want to log.
If you have a Channel List and you want to log all the channels in that list, then right click on the list and select ‘Add to PC logging’. All channels in that list will now be added to the list of channels to log.
If you want to log all the channels on a tab, right click on the tab name or some blank space on the tab, then click ‘Add all Channels to PC Logging’. This will add all channels on the tab to PC logging, regardless of how they are displayed (Channel List, Tacho, Bar Gauge etc).
Rate is the rate at which the data is read from the ECU where 0 is the fastest and 7 is the slowest. This can be altered by selecting the row of the channel you want to change and editing Update Rate in the Properties Window.
Log Playback
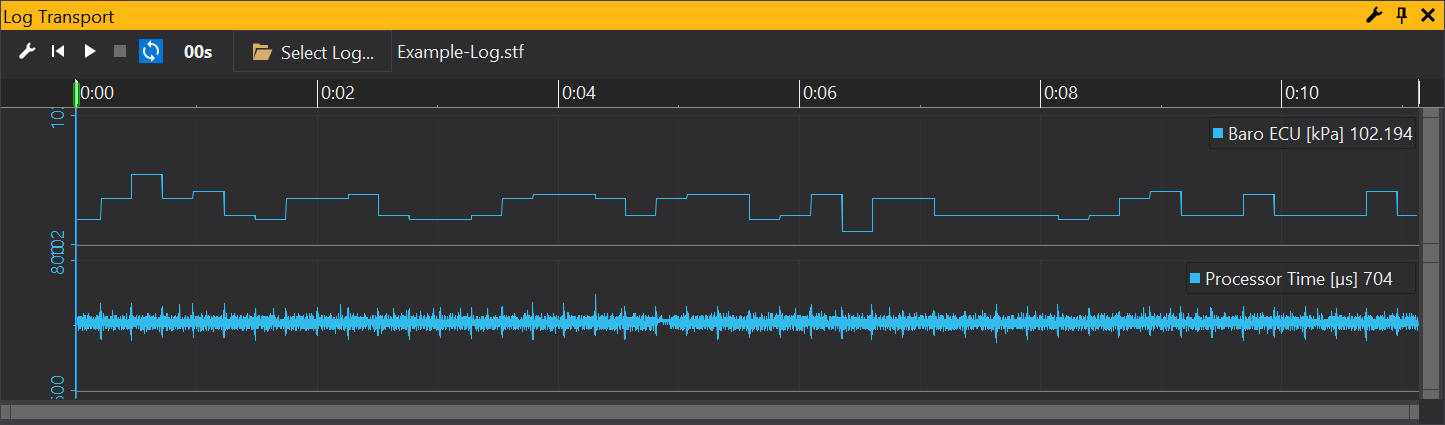
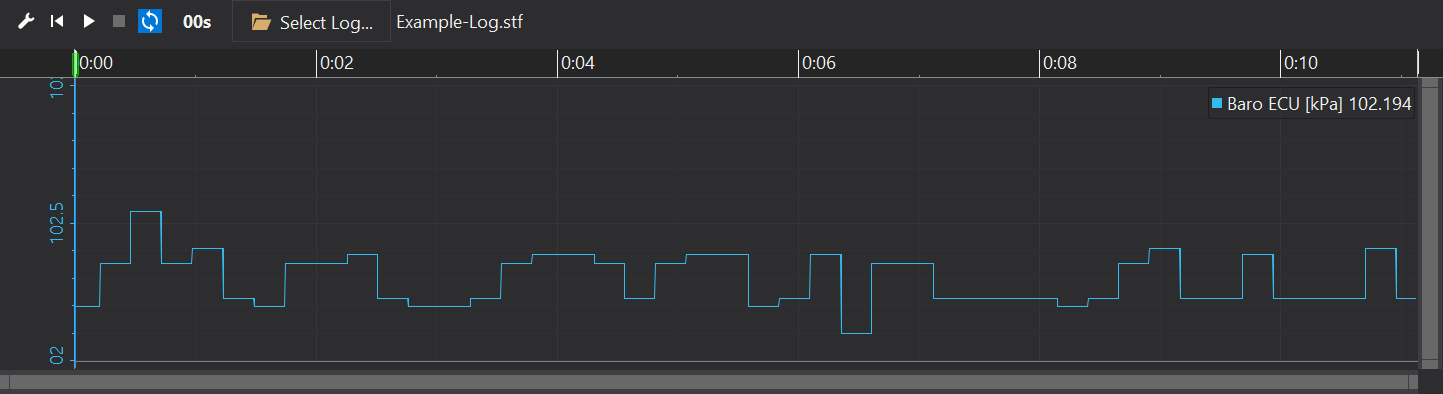
Log Playback allows the playback of data-logs downloaded from either an ECU, a data-logger or PC Logging with GWv4.
The data is visualized using a configurable graph and can be played back as if online to an ECU.
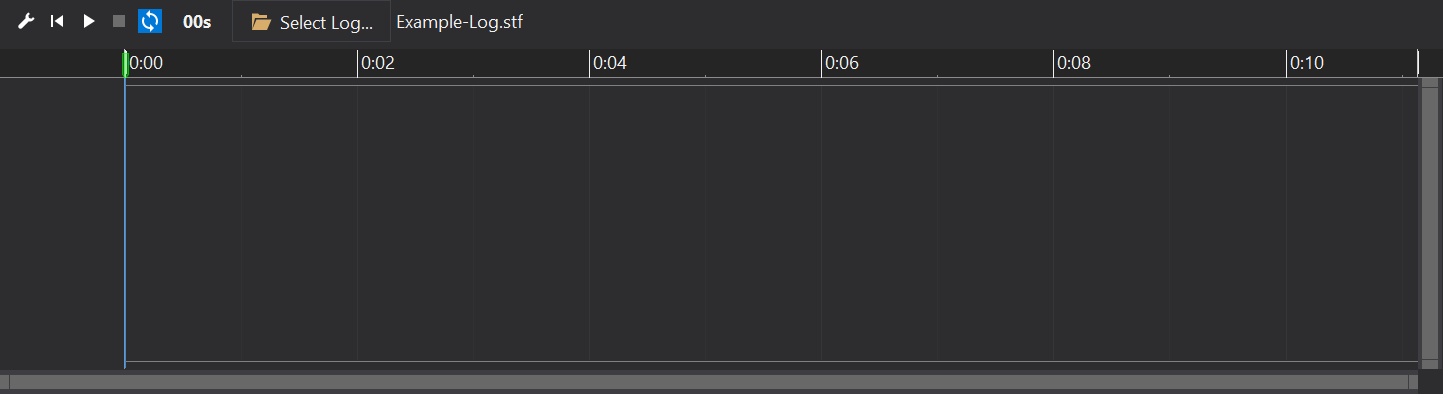
To access the Log Playback window, from the main menu select Log Playback. This will display the following window, if the log playback feature has been used before then there may already be a log loaded with some logging flags etc visible:
To load a data-log, click the ‘Select Log…’ button in the strip of controls at the top of the window. Use the file browser to locate a data-log and click ‘Open’.
Once opened, some channels may be displayed, or the log will appear empty. See {{ < topic “Setting up the Graph Lanes and Channels” > }} to add channels.
Playing and Stopping the Log
The log transport buttons in the top left of the playback window control the playing/stopping of the log:
This will set the log playback back to the begging of the log. If the log is currently playing, it will continue playing from the beginning. Default keyboard shortcut: Shift+F9
Starts the log playing. Default keyboard shortcut: F9
Stops the log playing. Default keyboard shortcut: F9
When on, the log will loop back to the beginning when it has reach the end.
Setting the current position
Simply click on the position on the graph you want to play from. A black line will indicate the current position. This can be done during playback.
Setting up the Graph Lanes and Channels
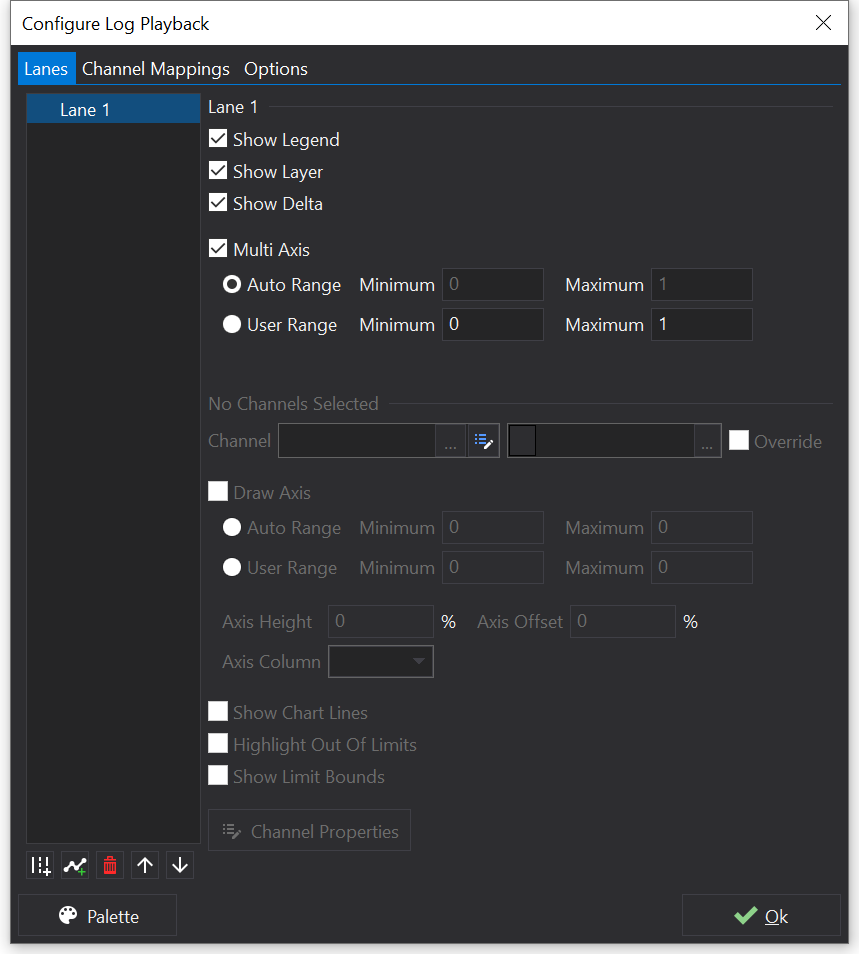
When you first load in the log, all data from the log will be displayed. You may want to show or hide some channels and also change their colour. To do this right click on the Log Playback graph and select ‘Configure…’. The following window will then be shown:
Add Lane - This will add a new lane which in itself can contain many channels. Lanes appear separately in the graph and can be resized individually.
Add Channel - Will add a new channel to the currently selected lane. A list of the available channels in the current data will be shown to select from and a selector for the colour you want the new channel to have.
Remove - Will remove the currently selected channel or lane. A lane can not be removed if it has any channels in it.
Move Up/Down - Moves the selected channel or lane up or down in the list. This will affect in what order they appear in the graph.
Minimum/Maximum - Sets the minimum and maximum range for the channel.
Colour - Sets the colour for the channel. Click on the colour for the channel, then click the ‘…’ button to change the colour.
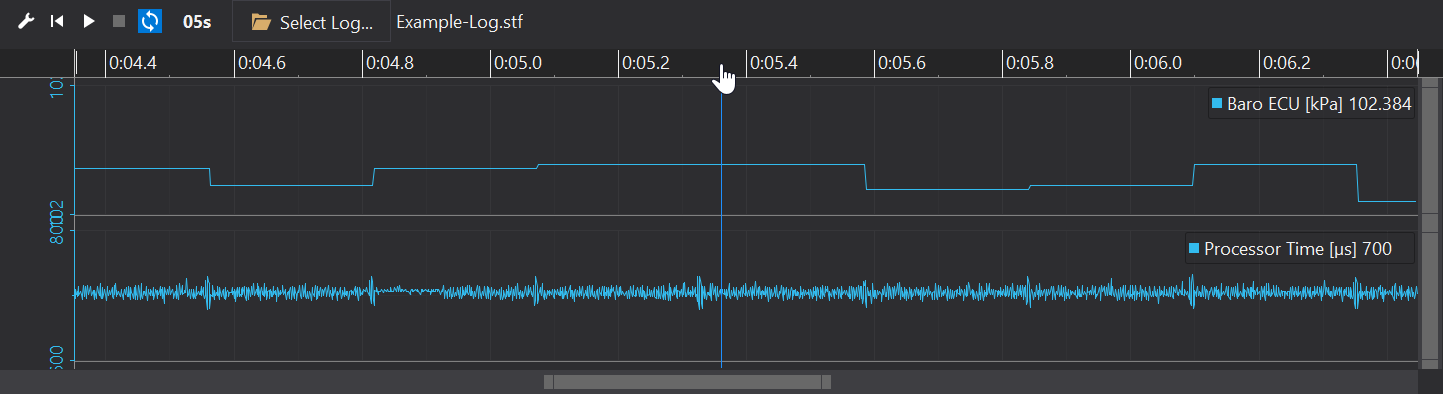
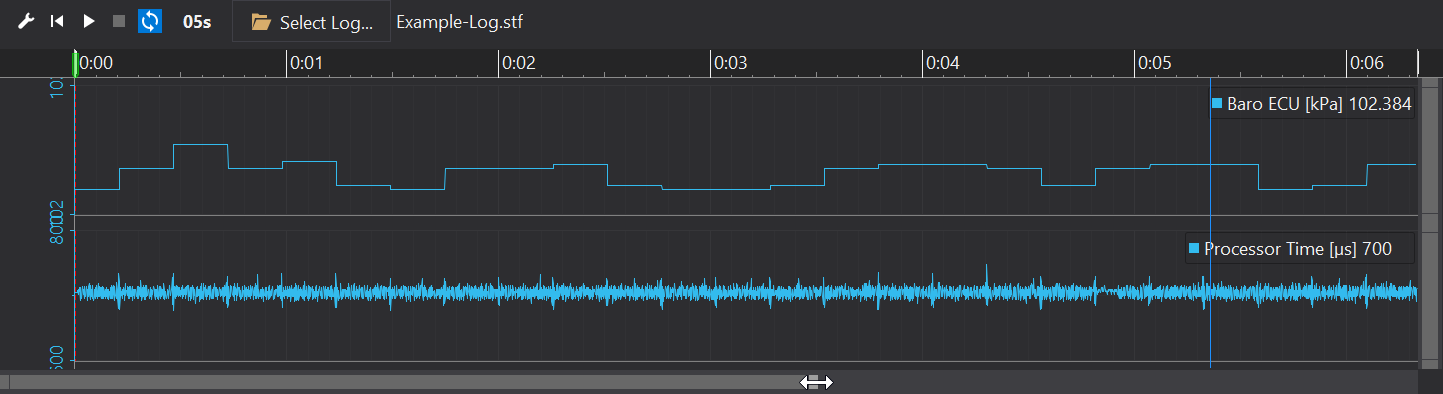
Zooming In/Out of the Graph
This can be done in two ways:
Click and hold the timeline at the top of the graph, then move the mouse up or down, down to zoom in and up to zoom out.
Use the scroll bar - click and drag on an end of the scroll bar. Making the scroll bar smaller will zoom in, making it larger will zoom out.
The same can also be done to the amplitude of the graph by adjusting the vertical scroll bar on the right hand side of the graph.
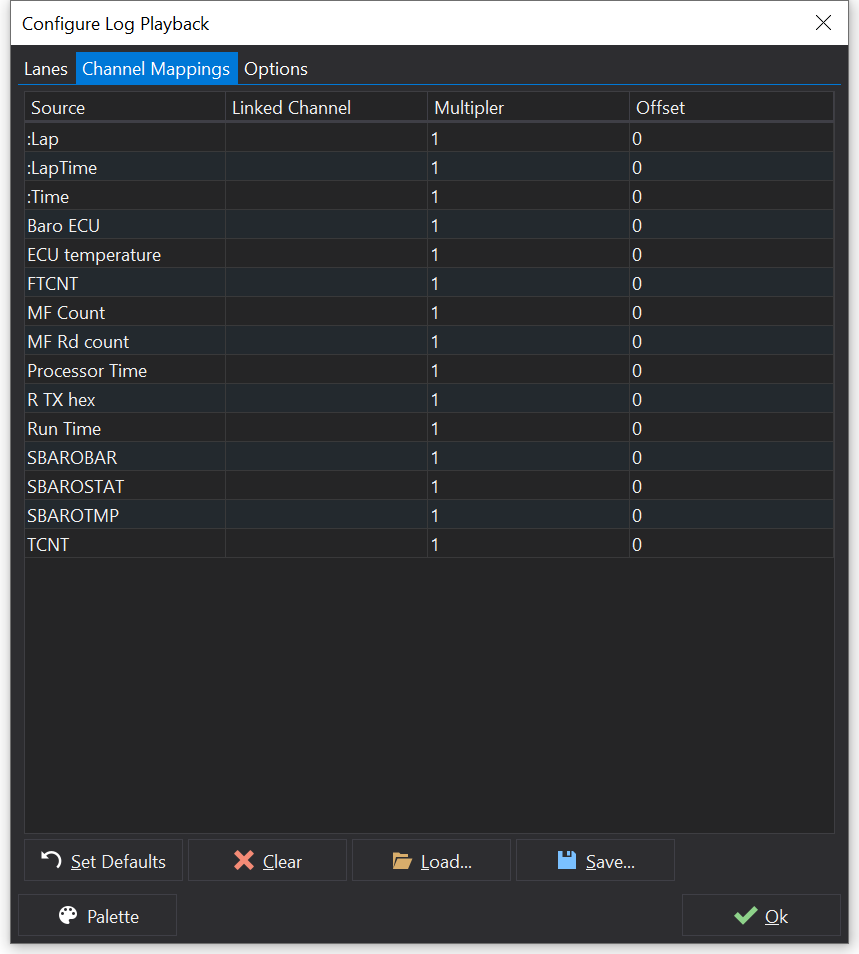
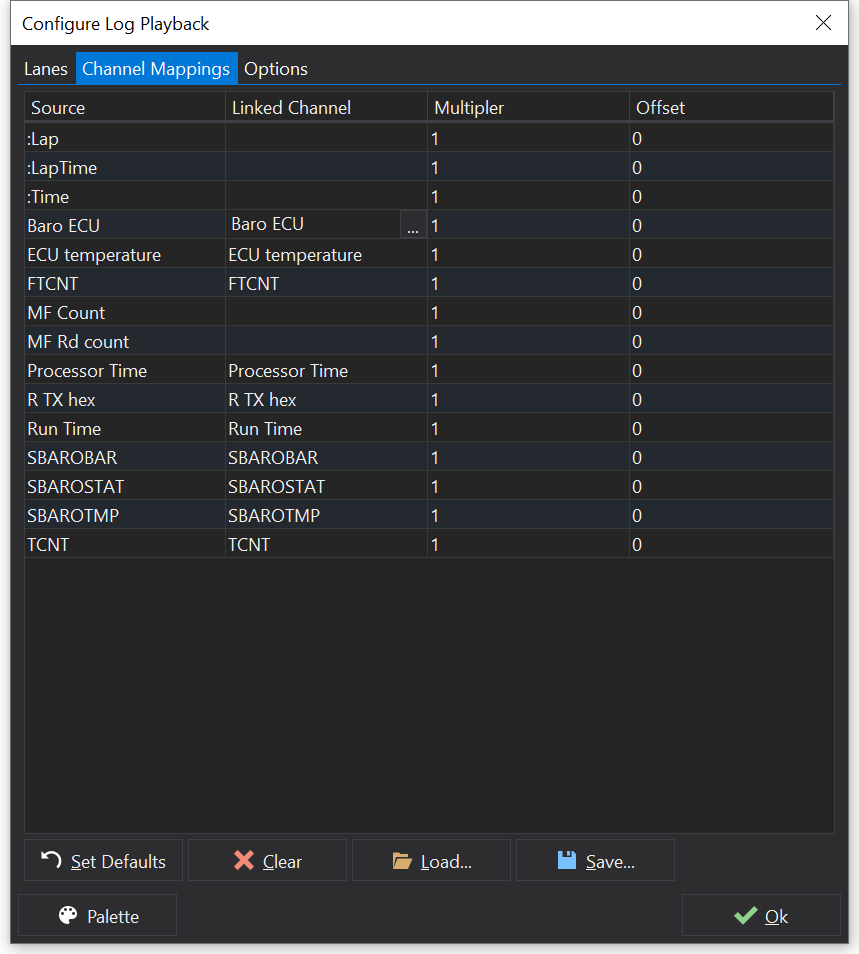
Linking Channels to Channels
Linking the channels in the data-log to channels currently displayed in GWv4 allows the data to be displayed as channel objects such as a Tacho, Bar Gauge or Channel List.
Right click on the graph and select ‘Configure…’ then select the ‘Channel Mappings’ tab:
To link a channel, simply click the ‘…’ in the Linked Channel column for the channel you want to map and select from the currently available channels. The linked channel will then be displayed:
Multiplier/Offset - Will multiply the raw value by the multiplier value and add or subtract the offset. Useful for converting units, for example: If road speed was recorded in Kph and you want to playback in Mph, then setting the multiplier to 0.62 would achieve this.
Set Defaults - This will automatically attempt to mach the channels from those currently available. This can be a quick way to link multiple channels. If the data-log was not made by the current ECU version, then names may differ and some channels will not auto-match.
Clear - Clears all the currently linked channels.
Load/Save - Allows you to load and save the currently linked channels.
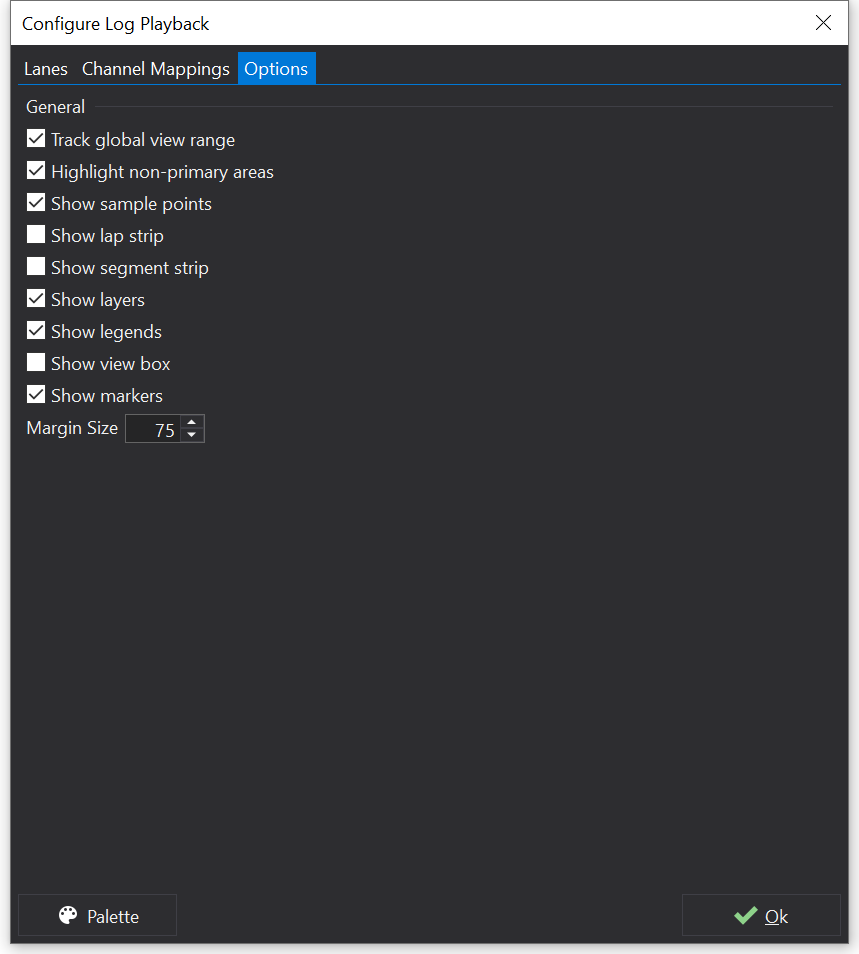
Configure View Options
The Options tab allows you to customise the Log Playback view:
ECU Internal Logging
ECU internal logging allows you to set up the data-logging settings for the current ECU.
Note
This feature will not be accessible if the current ECU type does not have the internal logging feature.
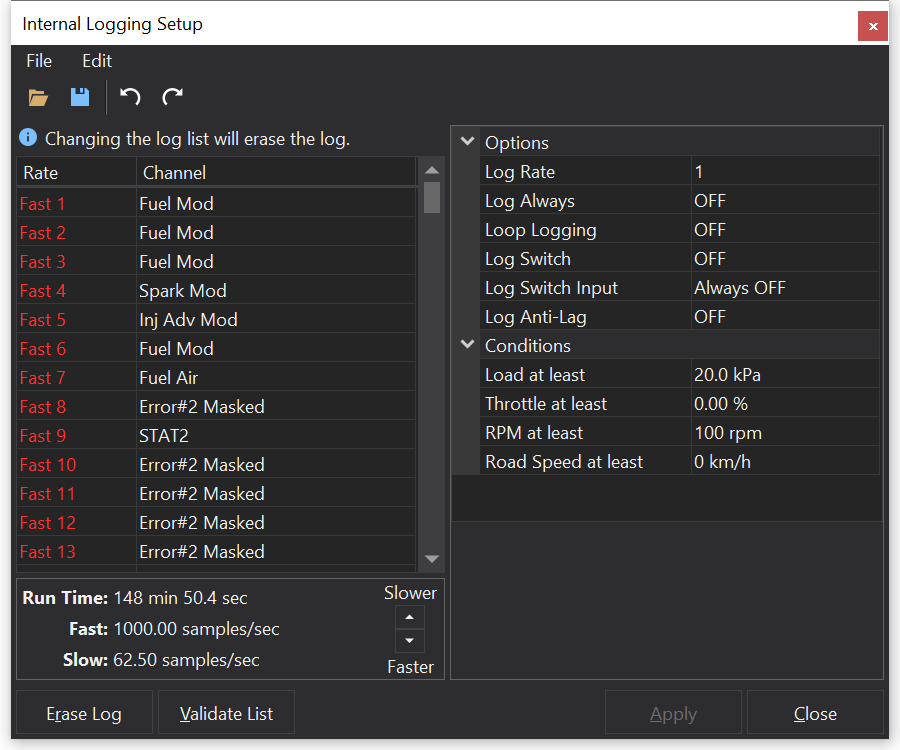
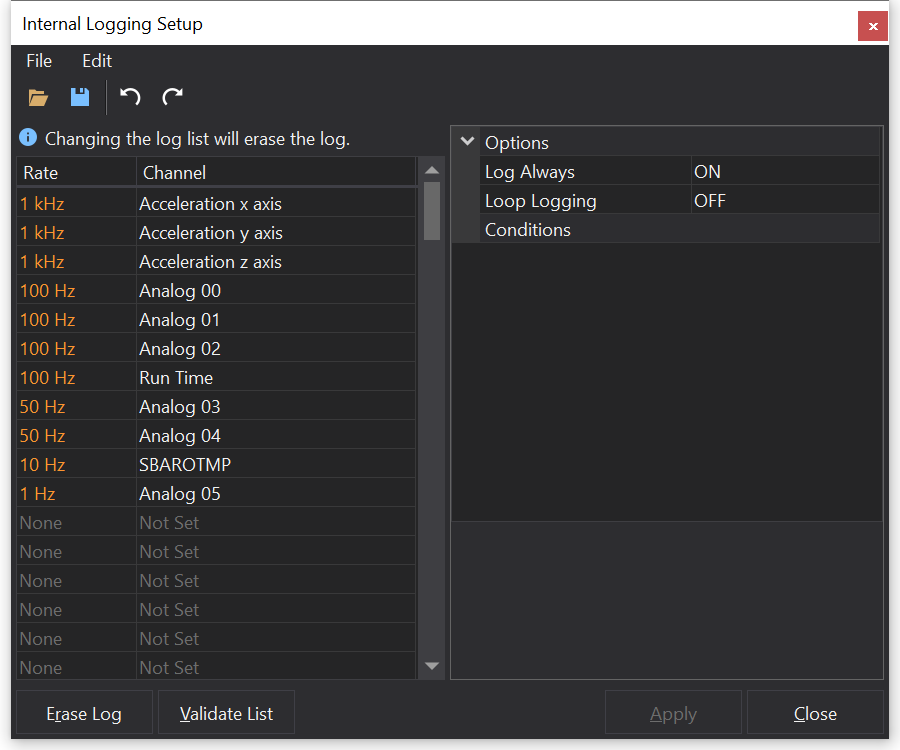
To open the ECU Internal Logging setup, from the main menu select ECU Internal Logging Setup... The following window will be displayed:
The example above is for ECU’s that can record 7 channels at a fast data-rate and 8 channels at a slow data-rate. These rates are displayed at the bottom of the window, along with Run Time which display how much logging time you will have with the current settings. To alter these rates, click up or down on the Change Rate control. This changes both the fast and slow channels to a new rate.
To setup the channels, select one of the channels you want to change and click the ‘…’ button. A list of the available channels will be display from which can select.
Options
Log Rate - The speed at which data-logging is recorded. A higher value = slower data-log.
Log Always - If ON the ECU will always log when it is powered on.
Log Switch - If ON this will use the Switch set by Log Switch Input to start and stop logging.
Log Switch Input - Switch number to use for triggering internal logging. To invert the switch set Log Switch Input to the negative of the Switch number. There are up to 127 switches, typically with 6 derived from analog input soft comparators. Some switches are associated with input pins on ECU, others decoded from bits received from messages on CANbus. Refer to the ECU manual for specific details for your ECU.
Log Anti-Lag - If ON the ECU will data-log when Anti-lag is on. Not all ECU’s have this feature.
Conditions
This are requirements that have to be met for the ECU to start logging.
Erase Log
This will erase the data in the ECU. If the ECU is currently logging it will continue to log after the erase.
Note
This action can not take place while the engine is running. The ECU will wait until the engine has stopped then perform the erase action.
Validate List
This will check that all the current settings for internal logging are correct and valid for the ECU.
Reading the Log
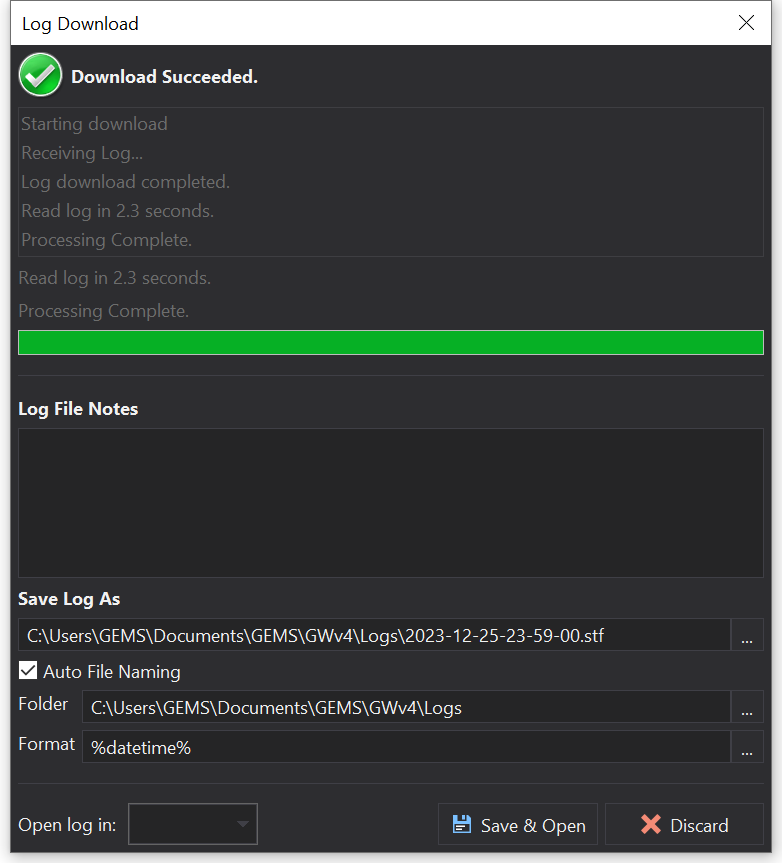
To read the internal log from a connected ECU, from the main menu select Read Internal Log... this will cause the following window to be displayed:
You can either retain the log after download or you can erase the log after download.
Assuming that ‘Log Always’ is ON, then if the log is retained, the log will just keep running as if you had not downloaded the log. If the log is erased, then the ECU will start a new log when the current one has been downloaded.
EM80-M Internal Logging
ECU internal logging allows you to set up the data-logging settings for the current ECU.
Note
This feature will not be accessible if the current ECU type does not have the internal logging feature.
To open the ECU Internal Logging setup, from the main menu select ECU Internal Logging Setup... If an EM80-M is connected then the following window will be displayed:
On the left the following logging rates can be selected:
1 kHz
500 Hz
250 Hz
200 Hz
125 Hz
100 Hz
50 Hz
40 Hz
20 Hz
10 Hz
8 Hz
5 Hz
4 Hz
2 Hz
1 Hz
This can be done for each individual channel that you wish to log. This can help to save space in the log, as the higher the rate of logging, the faster the log will fill up. This can also be helpful if the channel being logged does not change that often.
To setup the channels, select one of the Empty channels you want to fill and start typing in a channel name. GWv4 will start to predict matching channels in the current ECU, when you see the one you want simply select it. It is also possible to bring up an entire Channel List, this is done by clicking in the text box, and selecting the ‘…’ icon that appears in the right of the text box.
Options
Log Always - If ON the ECU will always log when it is powered on.
Loop Logging - If ON the ECU will start to overwrite the beginning of the log with new data when the log memory is full.
Erase Log
This will erase the data in the ECU. If the ECU is currently logging it will continue to log after the erase.
Note
This action can not take place while the engine is running. The ECU will wait until the engine has stopped then perform the erase action.
Validate List
This will check that all the current settings for internal logging are correct and valid for the ECU.
Reading the Log
To read the internal log from a connected ECU, from the main menu select Read Internal Log... this will cause the following window to be displayed:
You can either retain the log after download or you can erase the log after download.
Assuming that Log Always is ON, then if the log is retained, the log will just keep running as if you had not downloaded the log. If the log is erased, then the ECU will start a new log when the current one has been downloaded.
Engine History Log
Overview
The Engine History Log is a special type of data-log that is recorded automatically by the ECU. The log records key engine parameters over time, allowing you to review the performance and behavior of the engine during operation. This log is particularly useful for diagnosing issues that may not be apparent during normal data-logging sessions.
Note
The Engine History Log feature is only available on certain ECU models. Please refer to your ECU documentation to confirm if this feature is supported.
Accessing the Engine History Log
To access the Engine History Log, select Engine History Log… from the ECU menu.
Engine History Log Dialog
The Engine History Log dialog displays three main sections:
Left Panel: Calibration properties showing histogram configuration parameters such as bin start, bin width, and bin count for each histogram
Center Panel: Histogram views showing graphical representations of recorded data distributions
Right Panel: Summary information including engine run time, start time, and other key statistics
Histogram Selection
Use the histogram dropdown selector at the top of the center panel to view different histograms recorded in the engine history log. Each histogram displays the distribution of values for a specific parameter (e.g., RPM, Coolant Temperature, MAP, etc.).
Main Actions
Read ECU
Reads the current engine history log from the connected ECU. This retrieves the complete log data including:
All recorded histogram data
Engine run time and start time
Calibration settings
To read the log:
Ensure you are connected to the ECU
Click the Read ECU button
The dialog will update to display the retrieved data
Write ECU
The write operation allows the ECU to be replaced on an engine, whilst retaining the historical data from the previous ECU.
Write ECU writes the currently loaded engine history log to the connected ECU. This operation will overwrite any existing engine log in the ECU.
Warning
It is strongly recommended to archive a backup of the existing log before writing a new one.
To write the log:
Load or modify an engine history log
Click the Write ECU button
Confirm the operation in the warning dialog
If calibration changes have been made, choose whether to clear modified histograms or clear all data
Note
The Write ECU feature requires appropriate license permissions.
Clear ECU
Clears all data from the engine history log in the connected ECU, resetting all histogram values and the start time.
To clear the log:
Click the Clear ECU button
Select Clear all to reset all data and the start time, or Cancel to abort
The cleared log will be written to the ECU automatically
If no log is currently loaded, you will be prompted to select the Engine History Log version (0.1 or 0.2) to program to the ECU.
Note
The Clear ECU feature requires appropriate license permissions.
Open File
Opens a previously saved engine history log file from disk.
To open a file:
Click the Open File button
Navigate to the location of the .gehl file
Select the file and click Open
The dialog will display all histograms and summary information from the loaded file.
Save File
Saves the currently loaded engine history log to a file on disk.
To save a file:
Ensure a log is loaded (either read from ECU or opened from file)
Click the Save File button
Choose the destination folder and filename
Click Save
Files are saved with the .gehl extension (GEMS Engine History Log Files).
Editing Calibration
The calibration properties panel on the left allows you to modify histogram configuration parameters, including:
Bin Start: The starting value for histogram bins
Bin Width: The width of each histogram bin
Bin Count: The number of bins in the histogram
RPM Filter: Minimum engine speed for logging
Pedal Filter: Minimum pedal position for logging
Value Filter: Maximum value for logging - values above this will be ignored. For example, a coolant temperature value filter of 80 degrees means that the histogram won’t log anything above 80 degrees. This filters out erroneous noise on the value.
Example
The calibration below for Coolant Temperature has:
Parameter
Value
RPM Filter
150 rpm
Pedal Filter
80
Value Filter
120 degrees
Bin Start
0 degrees
Bin Size
5 degrees
Bin Count
22
This will cover the range of 0 degrees to 100 degrees, as shown below, and will only log while the engine speed is above 150 rpm, the pedal is above 80, and the temperature is below 120 degrees.
Modification Effects
When calibration values are modified:
The histogram view updates to reflect the new bin configuration
If you attempt to write the modified calibration to the ECU, you will be prompted to either:
Clear modified histograms: Only histograms with changed calibration will be cleared
Clear all: All histogram data and the start time will be reset
Info
Changing the calibration may require a manual commit (Store Changes in ECUCtrl+K) to make the changes permanent in the ECU.
Understanding the Data
The engine history log records histogram data for multiple engine parameters. Each histogram shows how frequently the engine has operated at different values for that parameter. This information is useful for:
Analyzing engine operating conditions over time
Identifying common operating points
Diagnosing performance issues
Validating calibration strategies
Monitoring engine health and usage patterns
Supporting warranty claims with historical data
Supported ECU Models
EM80
EM112
GDI80
Upgrading from v0.01 to v0.02 EHL
If a version 0.01 EHL file is written to the ECU with new firmware, it will automatically upgrade this to version 0.02, extracting the Log Start, Run Distance and Engine Speed histogram data.
To do this:
Before uploading the new (00x34) CoPro firmware, read the v0.01 EHL from the ECU and save this file.
Upload the new CoPro firmware.
Open the saved EHL file and write this to the ECU.
This will now be upgraded to the new EHL file type.
 This will set the log playback back to the begging of the log. If the log is currently playing, it will continue playing from the beginning. Default keyboard shortcut: Shift+F9
 Starts the log playing. Default keyboard shortcut: F9
 Stops the log playing. Default keyboard shortcut: F9
 When on, the log will loop back to the beginning when it has reach the end.